0x00 漏洞信息 最近glibc有一个栈溢出的漏洞具体情况,漏洞的具体信息可以参考下面两个链接。
Linux glibc再曝漏洞:可导致Linux软件劫持
CVE-2015-7547: glibc getaddrinfo stack-based buffer overflow
poc在上面的链接中可以下载。
0x01 环境准备 操作系统:ubuntu15.04
glibc版本:glibc-2.2.0
1.1 glibc源码编译 在ubuntu系统下,只需要执行源码和调试符的命令之后就可以使用gdb对glibc的跟踪调试,安装指令如下:
1
2
sudo apt-get install libc6-dbg sudo apt-get source libc6-dev
但是因为系统自带的glibc是发行版 的,所以在编译的是时候选用了优化参数 -O2,所以在调试的过程中会出现变量被优化无法读取 以及代码运行的时候与源码的行数 对不上的情况。
所以需要自己编译一个可调式并且没有过度优化的glibc来进行调试。
首先,从glibc的官网下载glibc的源码。我选择了2.20的版本。编译安装glibc的方法很容易可以在网上找到。需要注意的是在进行configure时需要设置一些特殊的参数。如果需要调试宏可以添加 -gdwarf-2,glibc无法使用-O0编译,不过-O1也够用了。
1 /opt/ glibc220/configure --prefix=/ usr/local/ glibc220/ --enable-debug CFLAGS="-g -O1" CPPFLAGS = "-g -O1"
在configure执行完成之后只需要简单执行编译与安装就好了。
1
2
sudo make sudo make install
1.2 使用调试版本glibc编译POC 在glibc编译安装成功后,系统默认的glibc还是原来的那个。所以需要选择指定的glibc来编译POC代码。
1 gcc -o client CVE-2015 -7547 -client .c -Wl,-rpath /usr/local/glibc220
通过ldd指令可以看到,确实使用了刚编的glibc。
这个时候就可以用GDB调试glibc中的函数了。
1.3 配置本地dns服务器 运行poc的python服务器。修改/etc/resolv.conf。将域名服务器改为127.0.0.1就好了。不过这样一来这台机器访问网络就会出问题了。
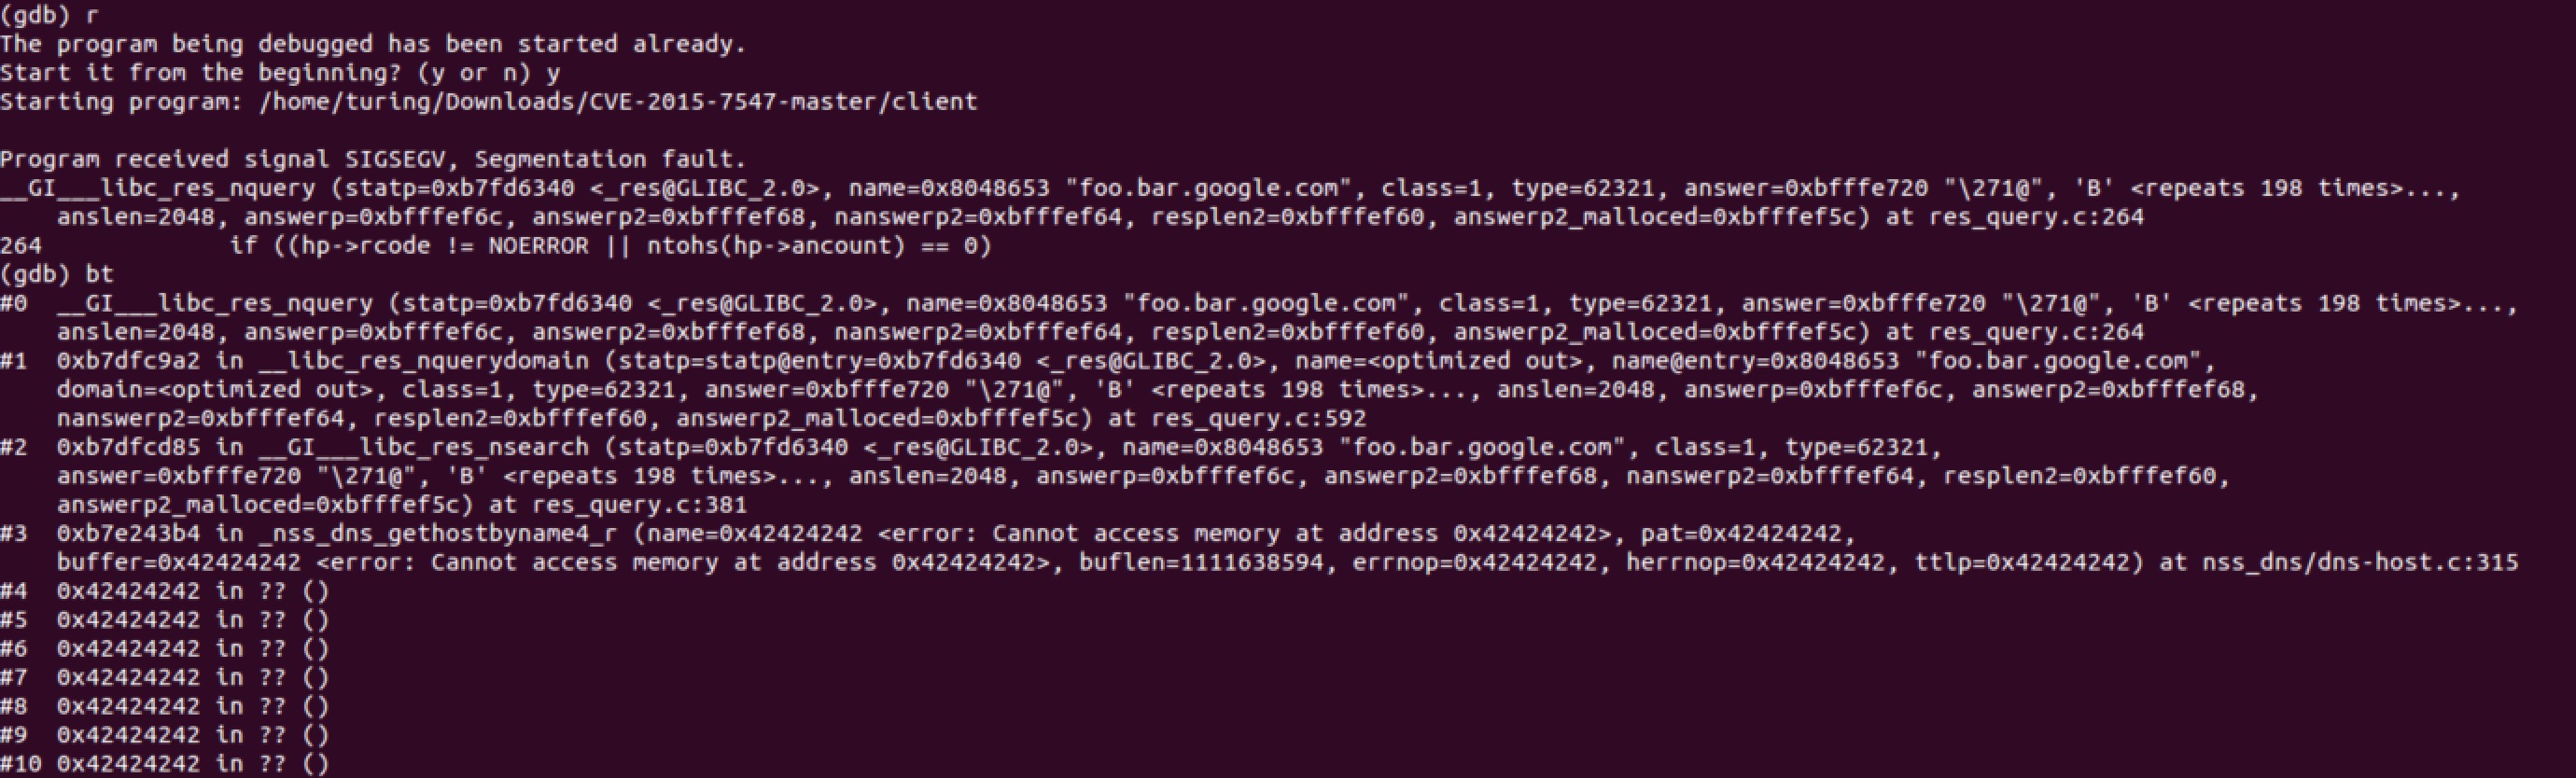
0x02 漏洞分析 2.1 运行POC 使用gdb启动客户端直接运行,出现崩溃堆栈。
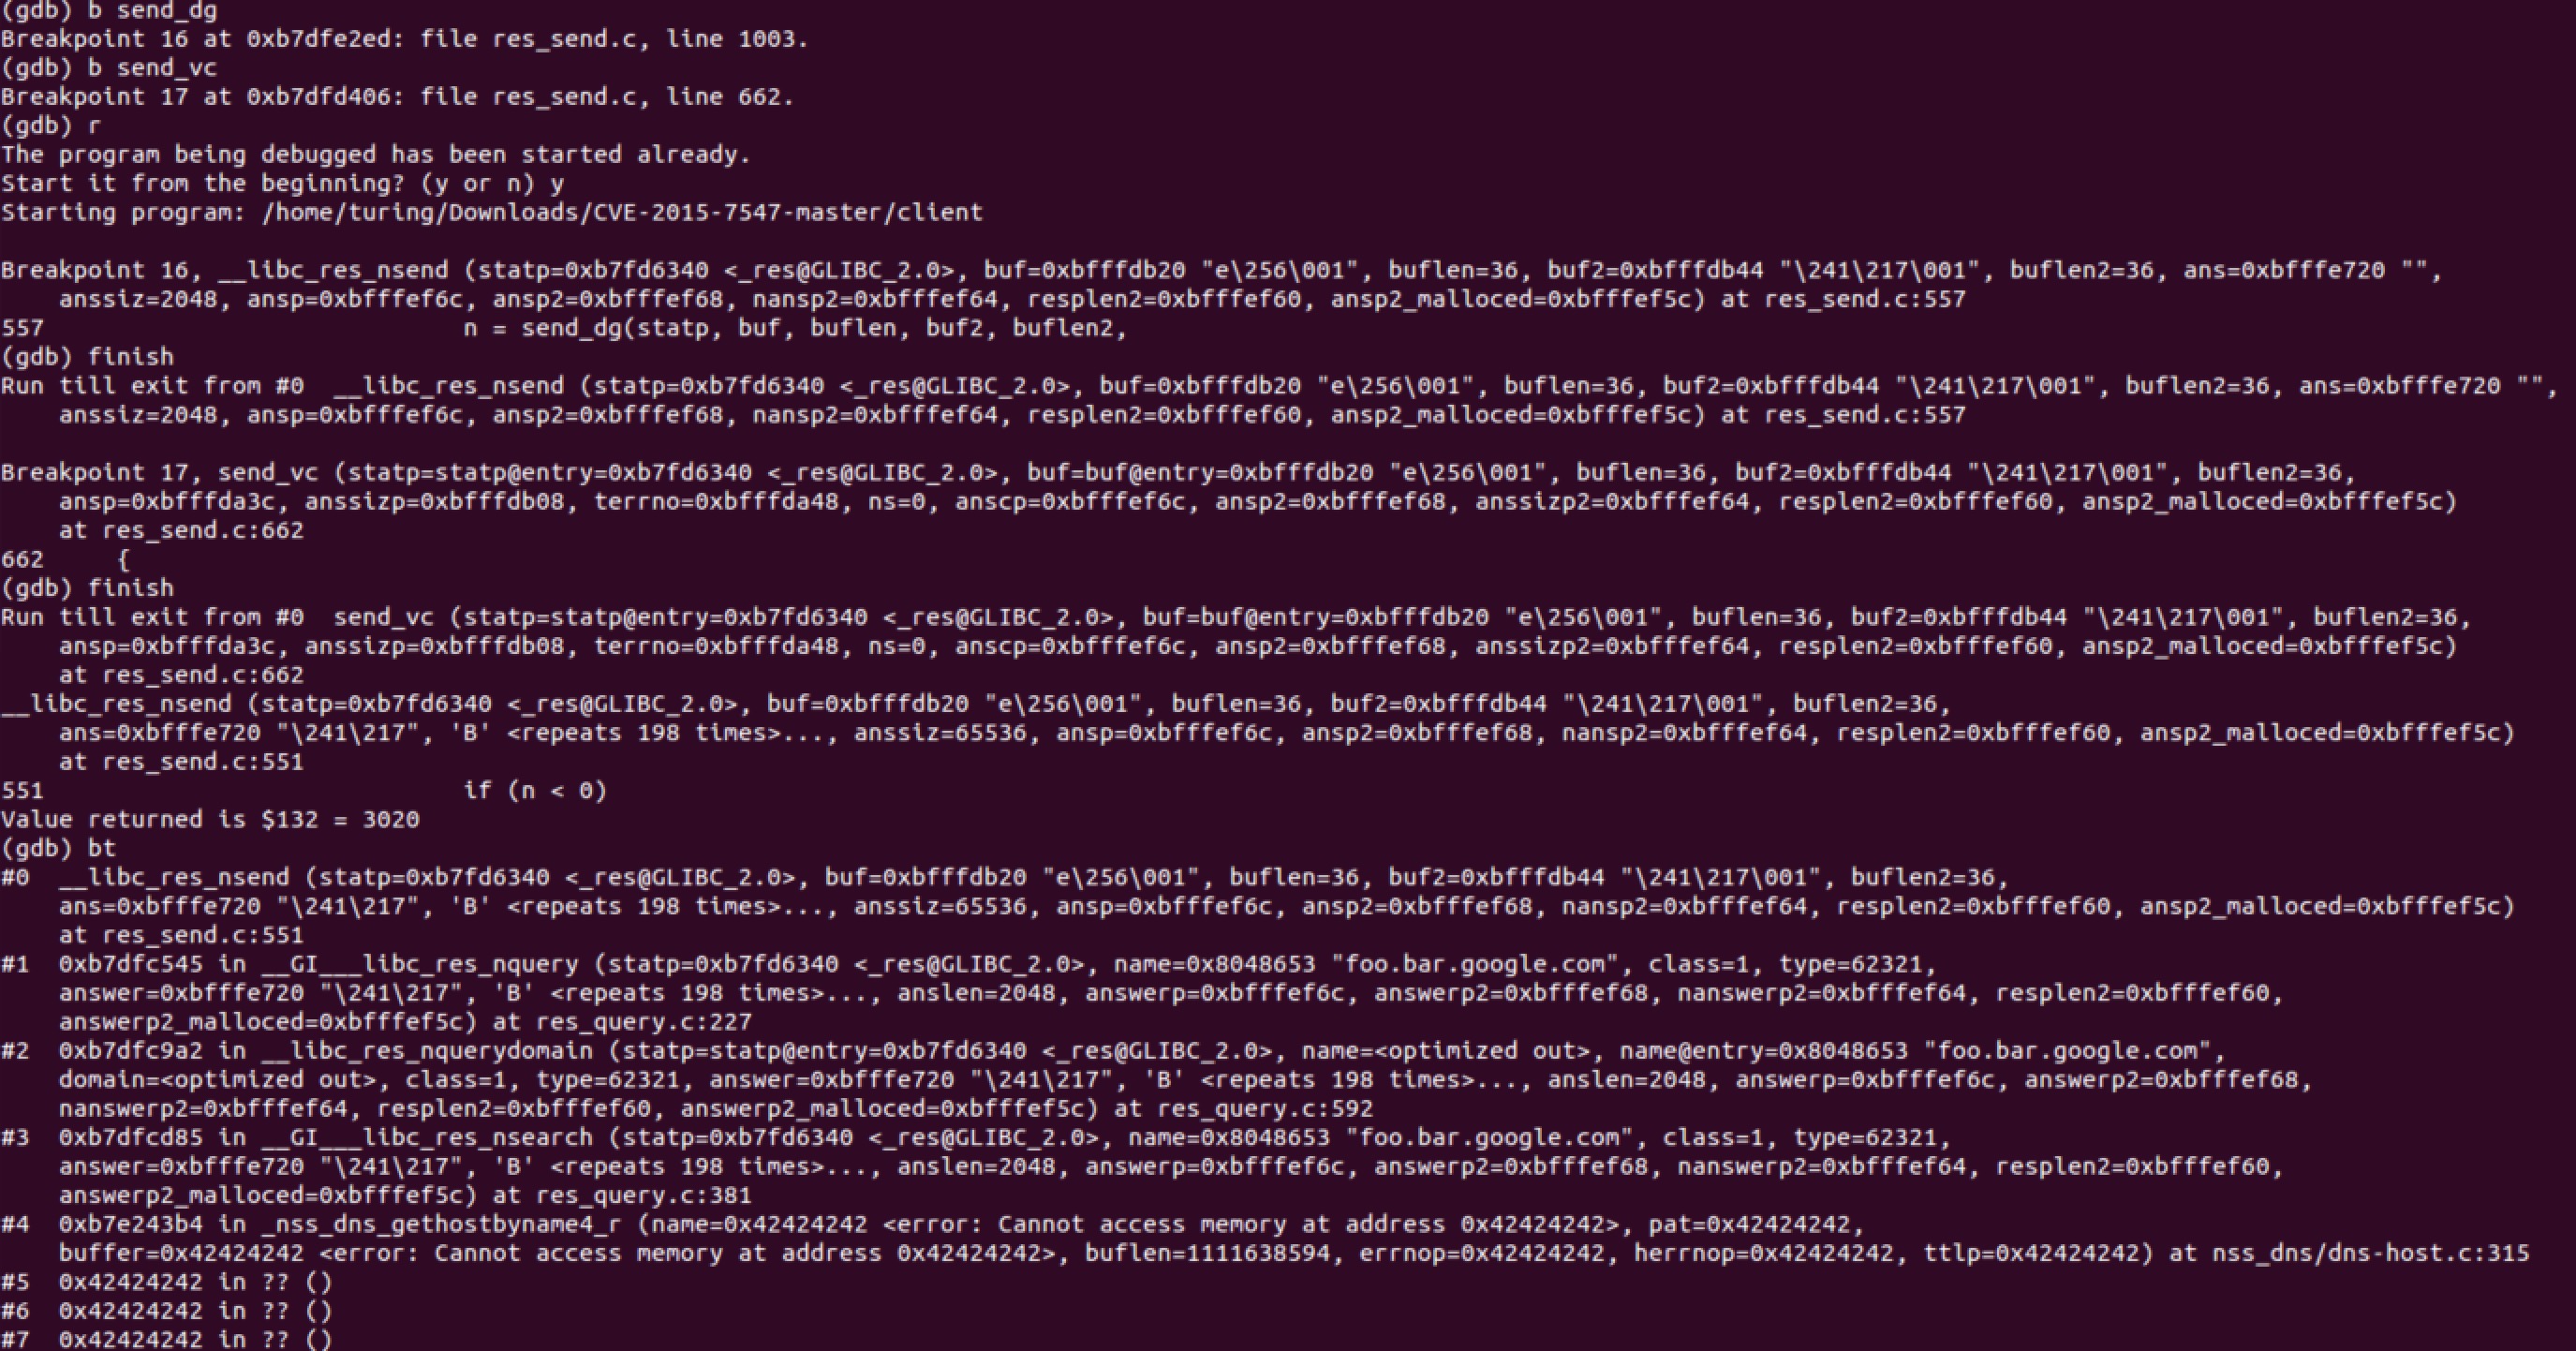
2.2 寻找溢出函数 可以看到栈都被覆盖为0x42424242,根据google提供的分析 ,出问题的是send_dg和send_vc函数。分别在send_vc和send_dg上下断点,重新运行程序,会发现先调用send_dg函数再调用send_vc函数。
可以看出是在send_vc的时候发生了栈溢出。
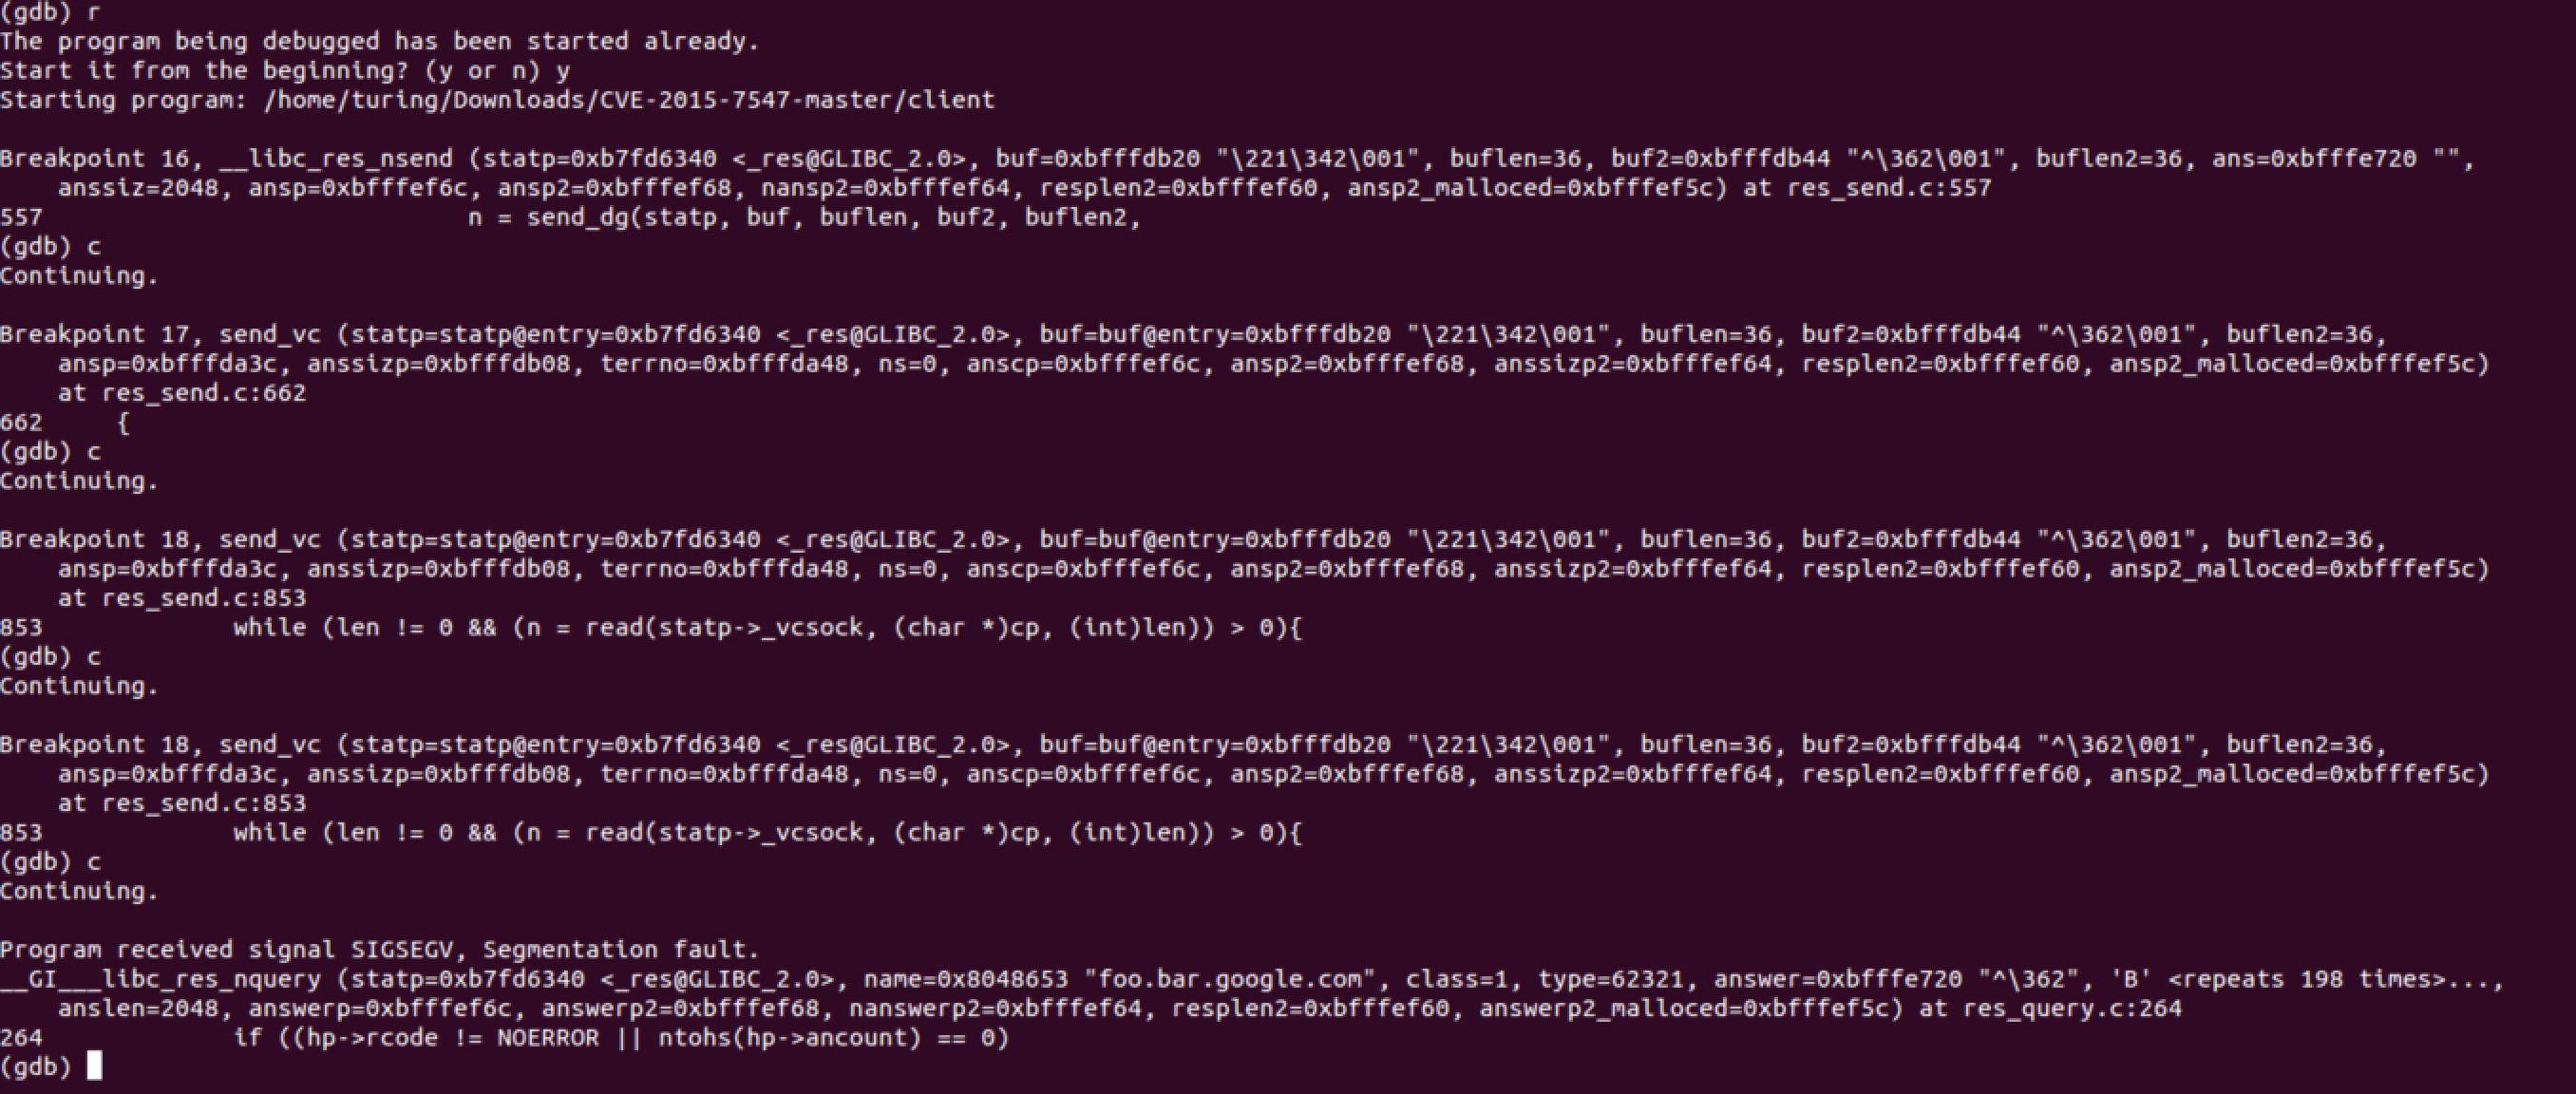
因为根据google提供的分析 可以知道是在读取socket的时候发生的溢出,可以通过结合源码调试来分析。剔除不需要看的代码,核心代码如下,总共干了四件事。
[1]选择适当的缓存
[2]读取dns包的长度
[3]读取dsn包
[4]判断是否需要读取第二个数据包。
1
2
3
4
5
6
7
8
9
10
11
12
13
14
15
16
17
18
19
20
21
22
23
24
25
26
27
28
29
30
31
32
33
34
35
36
37
38
39
40
41
42
43
44
45
46
47
48
49
50
51
52
53
54
55
56
57
58
59
60
61
62
63
64
65
66
67
68
69
70
71
72
73
74
75
76
77
78
79
80
81
82
83
84
85
86
87
88
89
90
91
92
93
94
95
96
97
98
99
100
101
102
103
104
105
106
107
108
109
110
111
112
113
114
static int send_vc (res_state statp, const u_char *buf, int buflen, const u_char *buf2, int buflen2, u_char **ansp, int *anssizp, int *terrno, int ns, u_char **anscp, u_char **ansp2, int *anssizp2, int *resplen2, int *ansp2_malloced) const HEADER *hp = (HEADER *) buf; const HEADER *hp2 = (HEADER *) buf2; u_char *ans = *ansp; int orig_anssizp = *anssizp; [...] read_len: cp = (u_char *)&rlen16; len = sizeof (rlen16); while ((n = TEMP_FAILURE_RETRY (read(statp->_vcsock, cp, (int )len))) > 0 ) { cp += n; if ((len -= n) <= 0 ) break ; } if (n <= 0 ) { [...] } int rlen = ntohs (rlen16); int *thisanssizp; u_char **thisansp; int *thisresplenp; if ((recvresp1 | recvresp2) == 0 || buf2 == NULL ) { thisanssizp = anssizp; thisansp = anscp ?: ansp; assert (anscp != NULL || ansp2 == NULL ); thisresplenp = &resplen; } else { if (*anssizp != MAXPACKET) { [...] } else { user-provided buffer. Maybe the second answer will. */ *anssizp2 = orig_anssizp; *ansp2 = *ansp; } thisanssizp = anssizp2; thisansp = ansp2; thisresplenp = resplen2; } anhp = (HEADER *) *thisansp; *thisresplenp = rlen; if (rlen > *thisanssizp) { [...] } else len = rlen; if (__glibc_unlikely (len < HFIXEDSZ)) { [...] } cp = *thisansp; while (len != 0 && (n = read(statp->_vcsock, (char *)cp, (int )len)) > 0 ){ cp += n; len -= n; } if (__glibc_unlikely (n <= 0 )) { [...] } if (__glibc_unlikely (truncating)) { [...] } * If the calling application has bailed out of * a previous call and failed to arrange to have * the circuit closed or the server has got * itself confused, then drop the packet and * wait for the correct one. */ if ((recvresp1 || hp->id != anhp->id) && (recvresp2 || hp2->id != anhp->id)) { [...] goto read_len; } if (recvresp1 == 0 && hp->id == anhp->id) recvresp1 = 1 ; else recvresp2 = 1 ; if ((recvresp1 & recvresp2) == 0 ) goto read_len; * All is well, or the error is fatal. Signal that the * next nameserver ought not be tried. */ return resplen; }
根据源码分析,从socket读取网络包数据的时候是溢出的地方,所以在这里下断点。
通过调用栈可以得知,read发生了两次[4],而且第一次是正确的,在第二次read之后发生了溢出。通过[1]可以得知,在两次调用read的时候cp指向的内存不同。
第一次调用read函数时,缓冲区为anscp 指向的内存。
第二次调用read函数时,缓冲区为ansp 指向的内存。这里暂时不用考虑二级指针的问题。
可以断定,ansp指针索引的地址出现了问题。ansp是调用时从参数传入的。所以需要通过分析send_vc的调用函数。
2.3 内存分配错误 send_vc的调用函数如下:
1
2
3
4
5
6
7
8
9
10
11
12
13
14
15
16
17
18
19
20
21
22
23
24
25
26
27
28
29
30
31
32
33
34
35
int __libc_res_nsend(res_state statp, const u_char *buf, int buflen, const u_char *buf2, int buflen2, u_char *ans, int anssiz, u_char **ansp, u_char **ansp2, int *nansp2, int *resplen2, int *ansp2_malloced) { [...] if (__glibc_unlikely (v_circuit)) { try = statp->retry; n = send_vc(statp, buf, buflen, buf2, buflen2, &ans, &anssiz, &terrno, ns, ansp, ansp2, nansp2, resplen2, ansp2_malloced); if (n < 0 ) return (-1 ); if (n == 0 && (buf2 == NULL || *resplen2 == 0 )) goto next_ns; } else { n = send_dg(statp, buf, buflen, buf2, buflen2, &ans, &anssiz, &terrno, ns, &v_circuit, &gotsomewhere, ansp, ansp2, nansp2, resplen2, ansp2_malloced); if (n < 0 ) return (-1 ); if (n == 0 && (buf2 == NULL || *resplen2 == 0 )) goto next_ns; if (v_circuit) goto same_ns; } [...] }
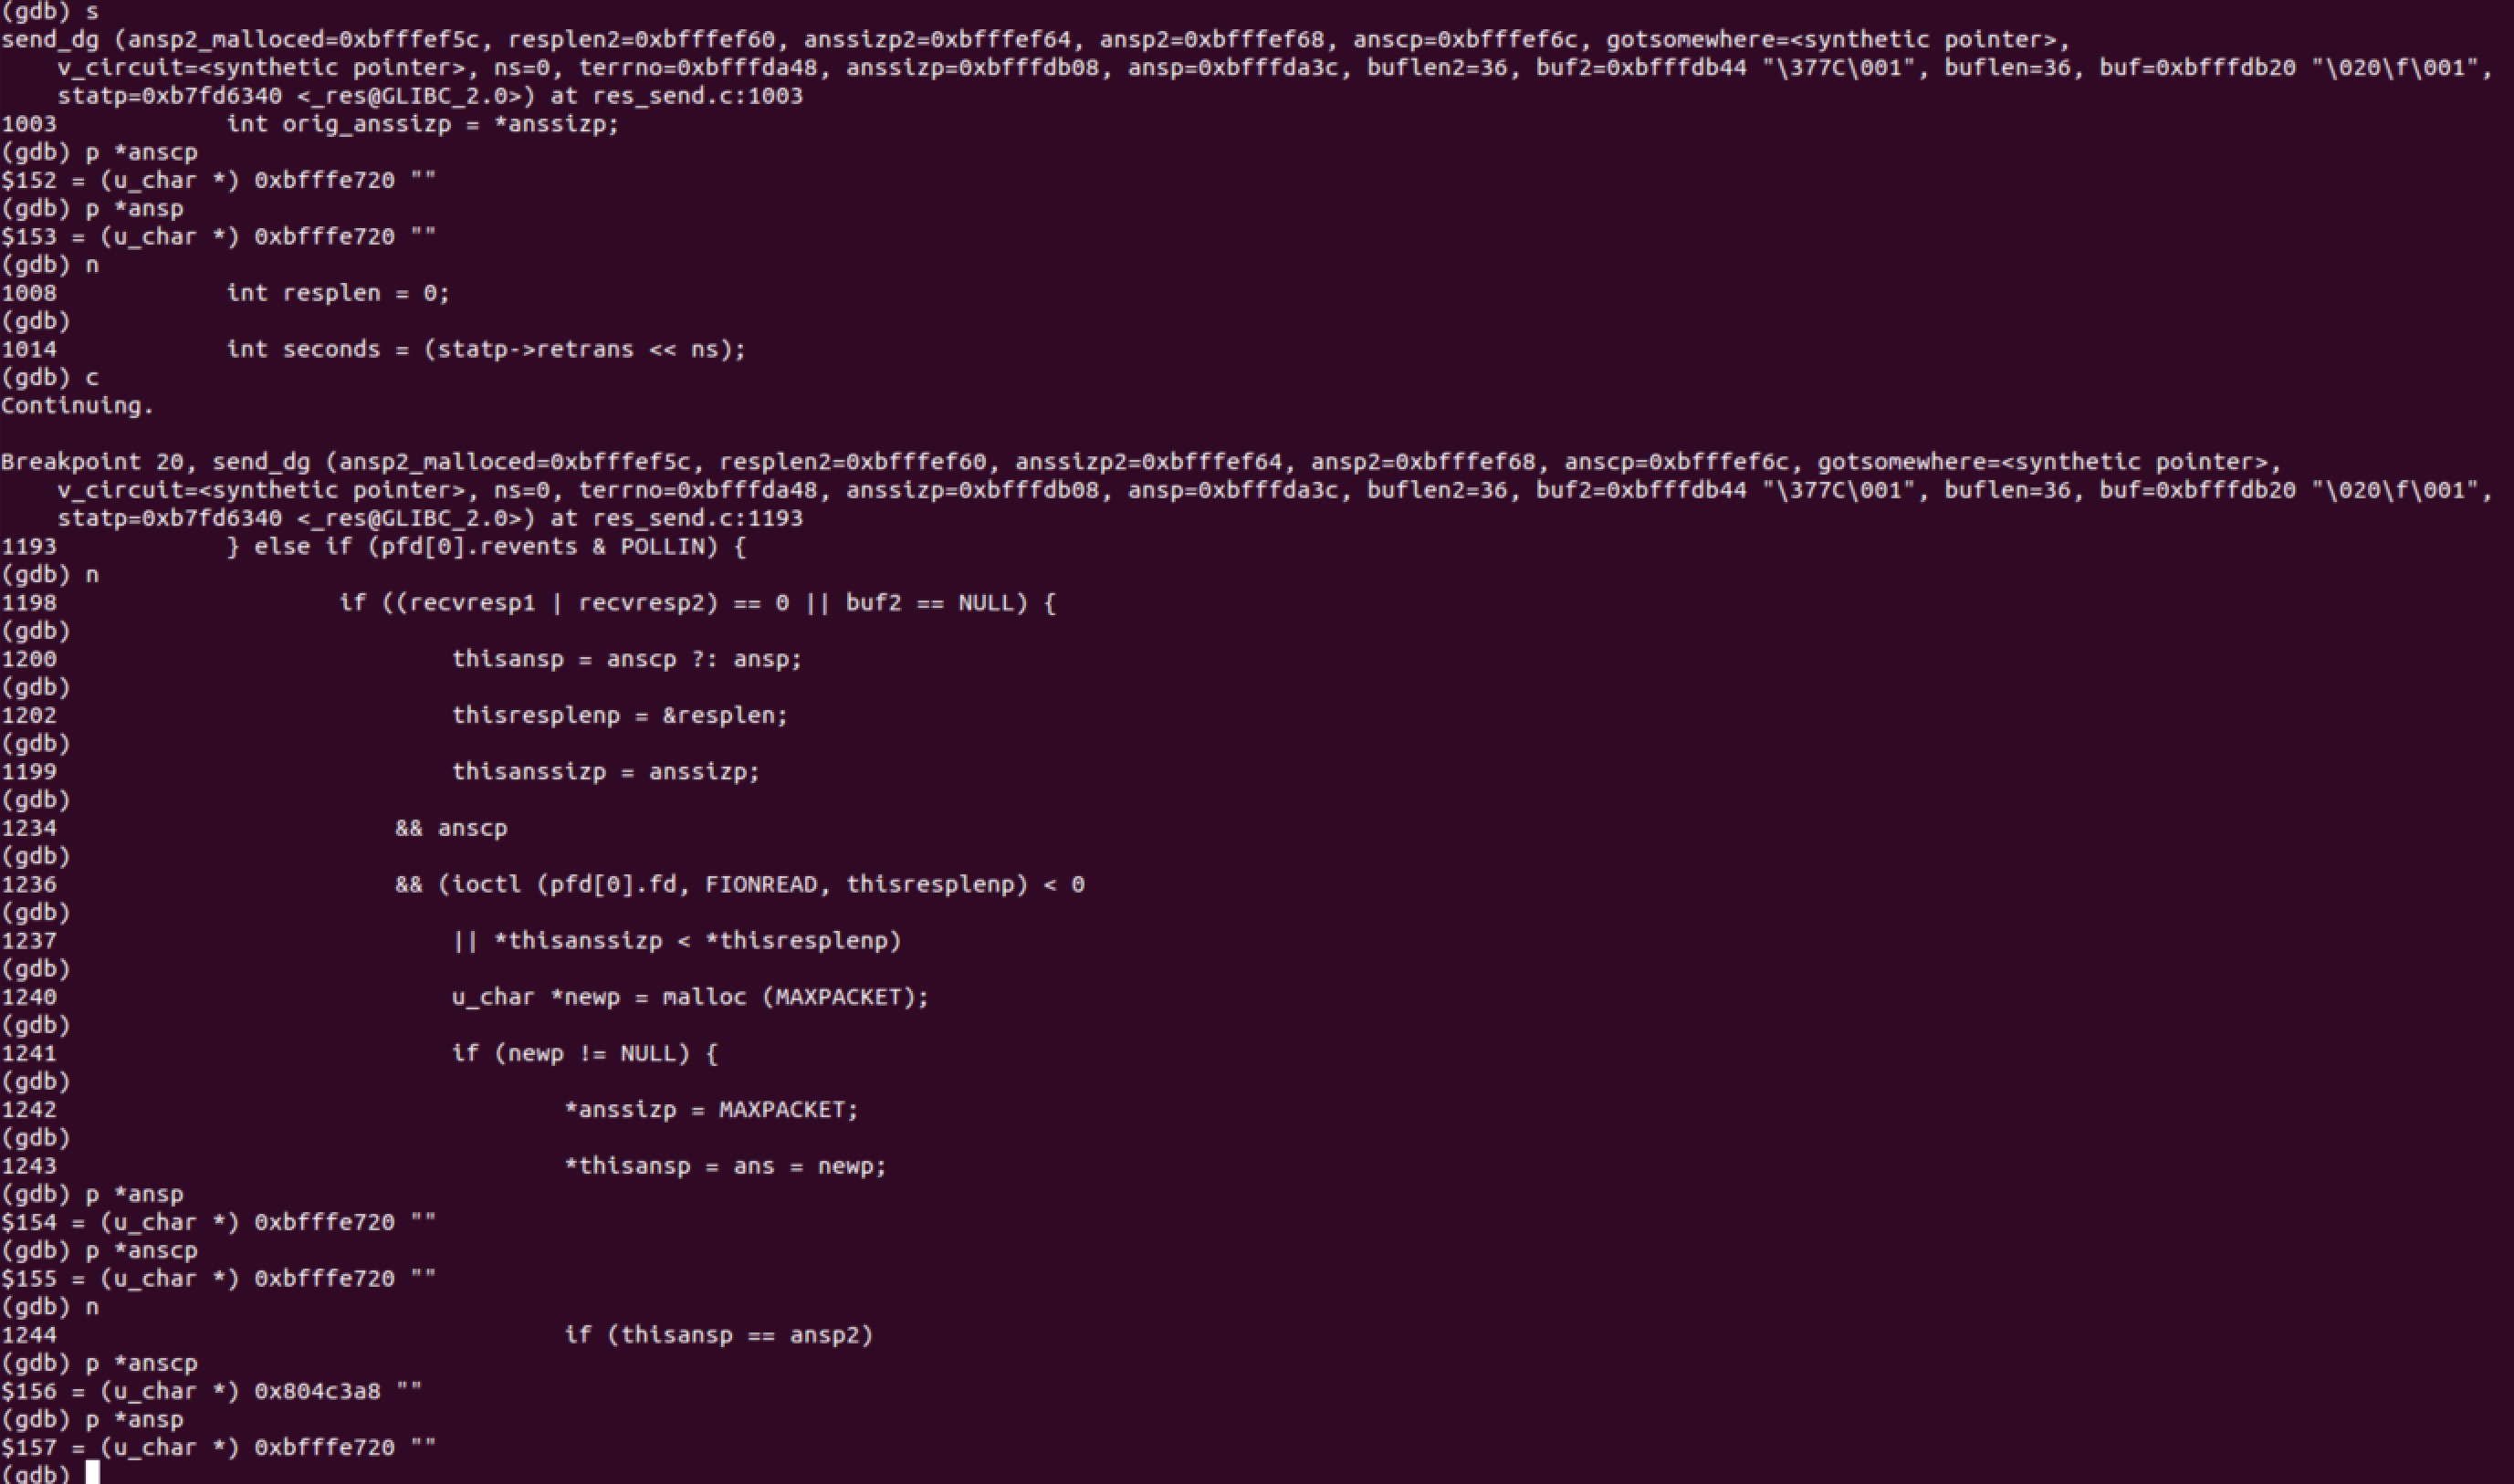
因为在调用send_vc之前程序先调用了send_dg,且两个函数参数基本相同,通过阅读源码会发现,send_dg对参数进行修改及新内存的申请。
1
2
3
4
5
6
7
8
9
10
11
12
13
14
15
16
17
18
19
20
21
22
23
24
25
26
27
28
29
30
31
32
33
34
35
36
37
38
39
40
41
42
43
44
45
46
47
48
49
50
51
52
53
static int send_dg (res_state statp, const u_char *buf, int buflen, const u_char *buf2, int buflen2, u_char **ansp, int *anssizp, int *terrno, int ns, int *v_circuit, int *gotsomewhere, u_char **anscp, u_char **ansp2, int *anssizp2, int *resplen2, int *ansp2_malloced) const HEADER *hp = (HEADER *) buf; const HEADER *hp2 = (HEADER *) buf2; u_char *ans = *ansp; int orig_anssizp = *anssizp; struct timespec now, timeout, finish; struct pollfd pfd[1 ]; int ptimeout; struct sockaddr_in6 from; int resplen = 0 ; int n; [...] else if (pfd[0 ].revents & POLLIN) { int *thisanssizp; u_char **thisansp; int *thisresplenp; if ((recvresp1 | recvresp2) == 0 || buf2 == NULL ) { thisanssizp = anssizp; thisansp = anscp ?: ansp; assert (anscp != NULL || ansp2 == NULL ); thisresplenp = &resplen; } else { [...] } if (*thisanssizp < MAXPACKET both will be allocatable. */ && anscp #ifdef FIONREAD && (ioctl (pfd[0 ].fd, FIONREAD, thisresplenp) < 0 || *thisanssizp < *thisresplenp) #endif ) { u_char *newp = malloc (MAXPACKET); if (newp != NULL ) { *anssizp = MAXPACKET; *thisansp = ans = newp; if (thisansp == ansp2) *ansp2_malloced = 1 ; } }
通过调试可以看出,ansp仍然指向大小为2048的缓冲区,而anscp指向了大小为65536的缓冲区。之后这两个指针又被传递给了send_vc。
2.4 溢出原因 所以溢出的原因是,*anssizp因为在之前的send_dg中被赋值为65536,send_vc中第二次调用read函数时,认为ansp指向的缓冲区的大小为*anssizp即65536,而实际上ansp指向了一块只有2048大小的缓冲区。所以在从socket读取大于2048个字节之后产生了栈溢出。
0x03 参考&感谢 感谢分享:)
CVE-2015-7547 — glibc getaddrinfo() stack-based buffer overflow
https://sourceware.org/ml/libc-alpha/2016-02/msg00416.html
Linux glibc再曝漏洞:可导致Linux软件劫持
http://www.freebuf.com/news/96244.html
CVE-2015-7547: glibc getaddrinfo stack-based buffer overflow
https://googleonlinesecurity.blogspot.com/2016/02/cve-2015-7547-glibc-getaddrinfo-stack.html
glibc编译debug版本
http://blog.csdn.net/jichl/article/details/7951996
glibc的编译和调试
http://blog.chinaunix.net/uid-20786208-id-4980168.html