0x00 摘要 分析CVE-2016-1757 的EXP过程中,发现EXP通过对kextload程序的patch,绕过了OSX对驱动扩展数字签名的检测,成功加载未签名的驱动扩展。
0x01 数字签名与内核扩展 OSX系统在加载内核扩展时要求必须拥有苹果的开发者签名。在开发过程中,在自己的调试环境中可以通过修改参数加载没有签名的驱动,进行开发与调试。
1.1 OS X 10.11之后版本 在OS X 10.11中引入的Rootless机制之后只需要关闭Rootless机制就可以加载没有签名的驱动扩展。细节可以参考这一篇文章。OS X 10.11中Rootless的实现与解释以及关闭方法
1.2 OS X 10.11之前版本 在OS X 10.11之前的版本需要修改内核启动参数,并重启系统
1
2
sudo nvram boot-args="kext-dev-mode=1" sudo reboot
0x02 Patch详细分析 通过对kextload程序patch前后的对比可以发现,总共对两个函数进行了patch。
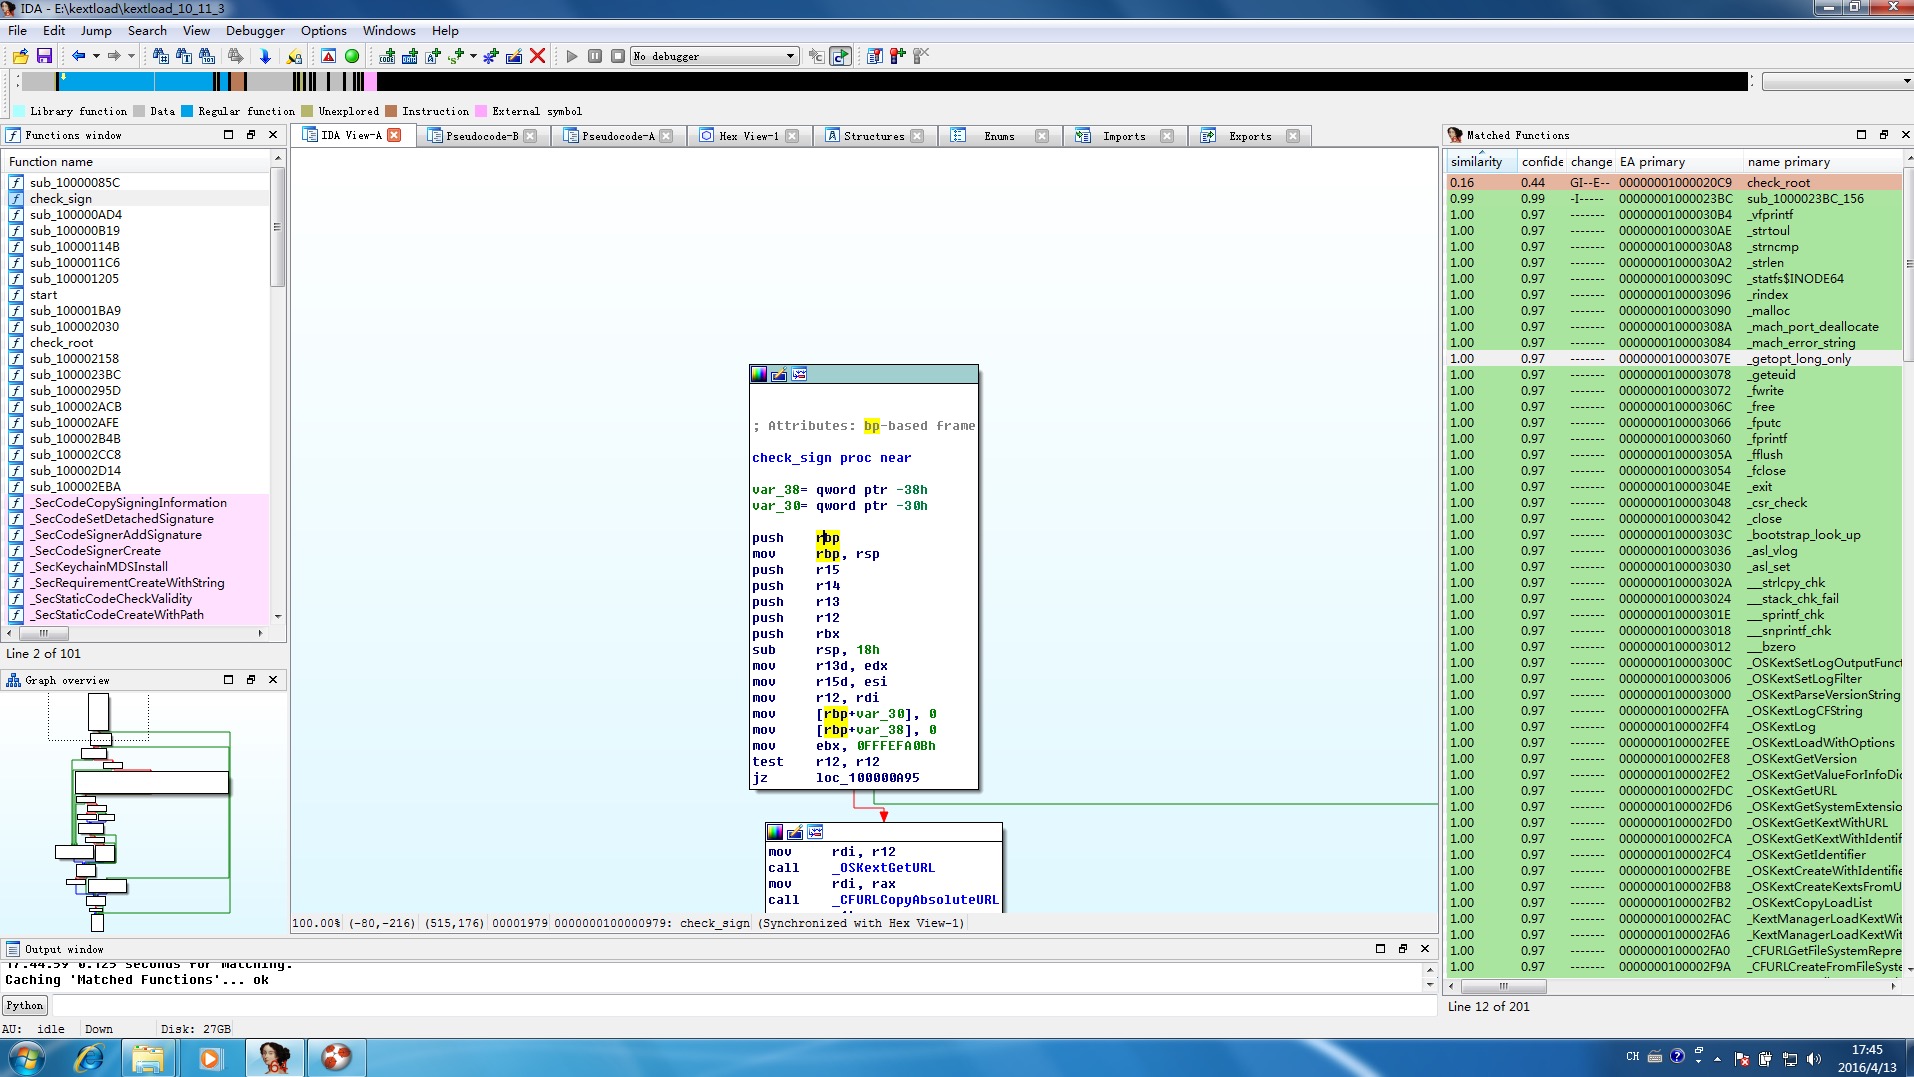
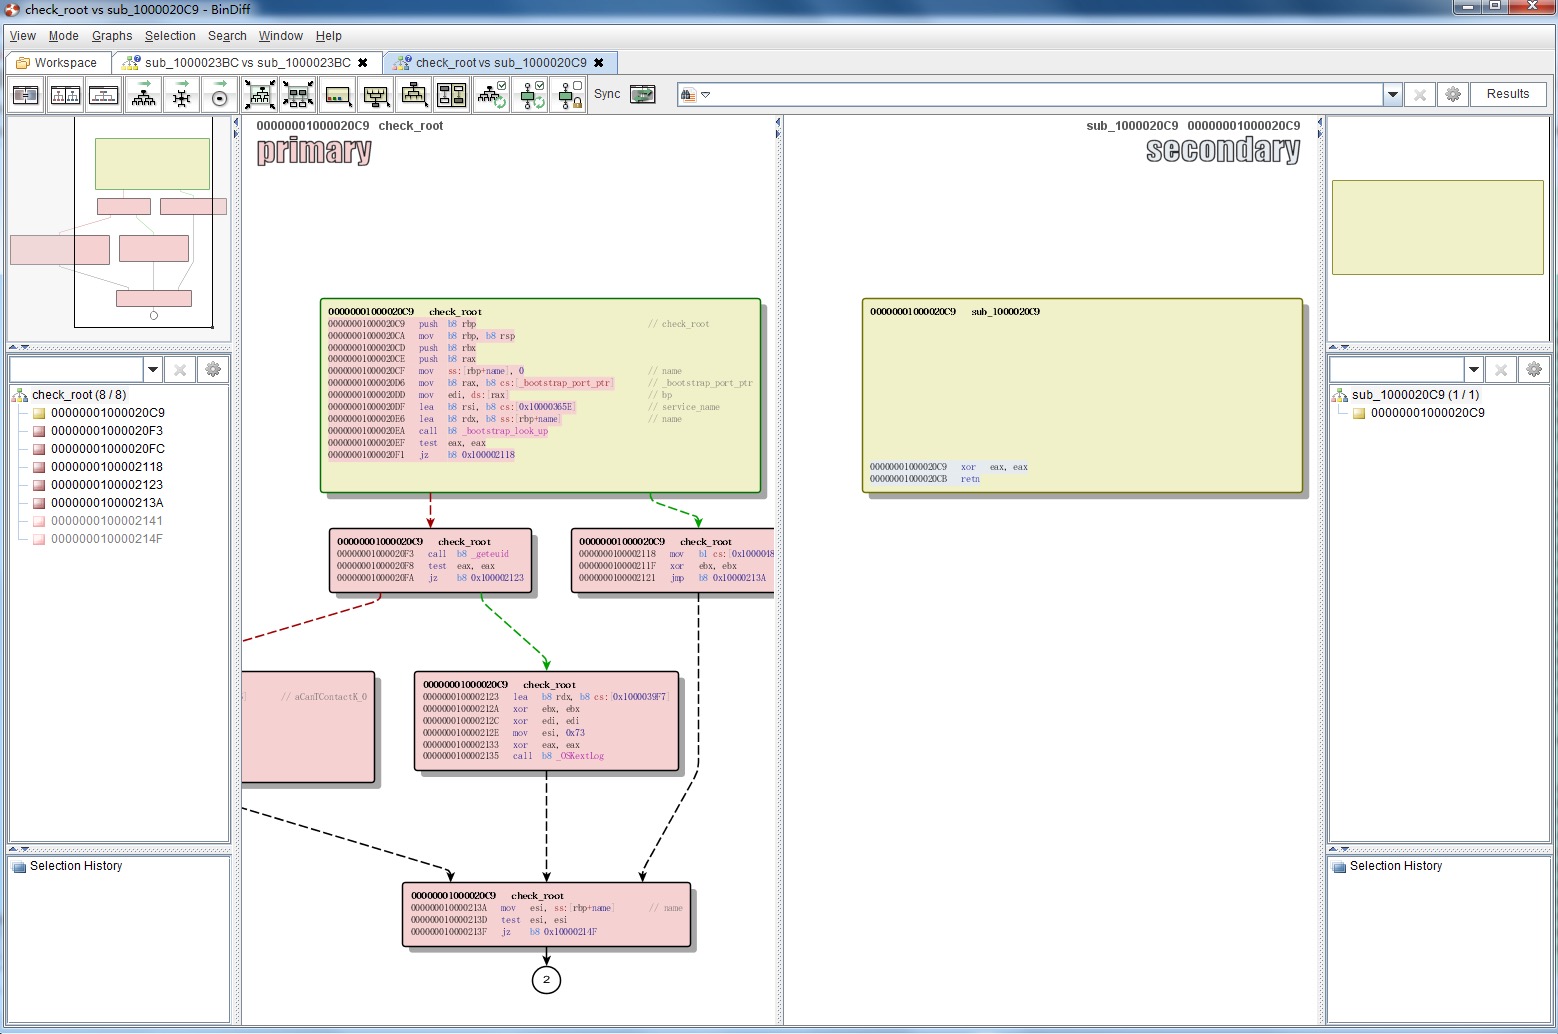
2.1 sub_100020c9(check_root) 通过bindiff发现,sub_100020c9函数改变非常的大(rename成了check_root,不一定完全正确),patch前后对比如下图所示:
该函数内容被完全替换,直接返回0。
通过ida看一下替换前该函数的伪代码,可以大致了解该函数的作用。
1
2
3
4
5
6
7
8
9
10
11
12
13
14
15
16
17
18
19
20
21
22
23
24
25
26
27
28
29
__int64 __usercall check_root@<rax>(__int64 a1@<rax>) { signed int v1; __int64 v3; v3 = a1; HIDWORD(v3) = 0 ; if ( bootstrap_look_up(*(_DWORD *)bootstrap_port_ptr, "com.apple.KernelExtensionServer" , (mach_port_t *)&v3 + 1 ) ) { if ( geteuid() ) { OSKextLog(0L L, 113L L, "Can't contact kextd; must run as root to load kexts." ); v1 = 77 ; } else { v1 = 0 ; OSKextLog(0L L, 115L L, "Can't contact kextd; attempting to load directly into kernel." ); } } else { byte_100004808 = 1 ; v1 = 0 ; } if ( HIDWORD(v3) ) mach_port_deallocate(*(_DWORD *)mach_task_self__ptr, HIDWORD(v3)); return (unsigned int )v1; }
可以看到返回0的情况有两种:
能够获取到与com.apple.KernelExtensionServer通信的port。
没有获取到port,但是拥有root权限。
逻辑比较简单,应该就是为后面的内核扩展加载检测一下权限和资源。patch后直接返回0。
1
2
3
4
__int64 __usercall check_root@<rax>(__int64 a1@<rax>) { return 0 ; }
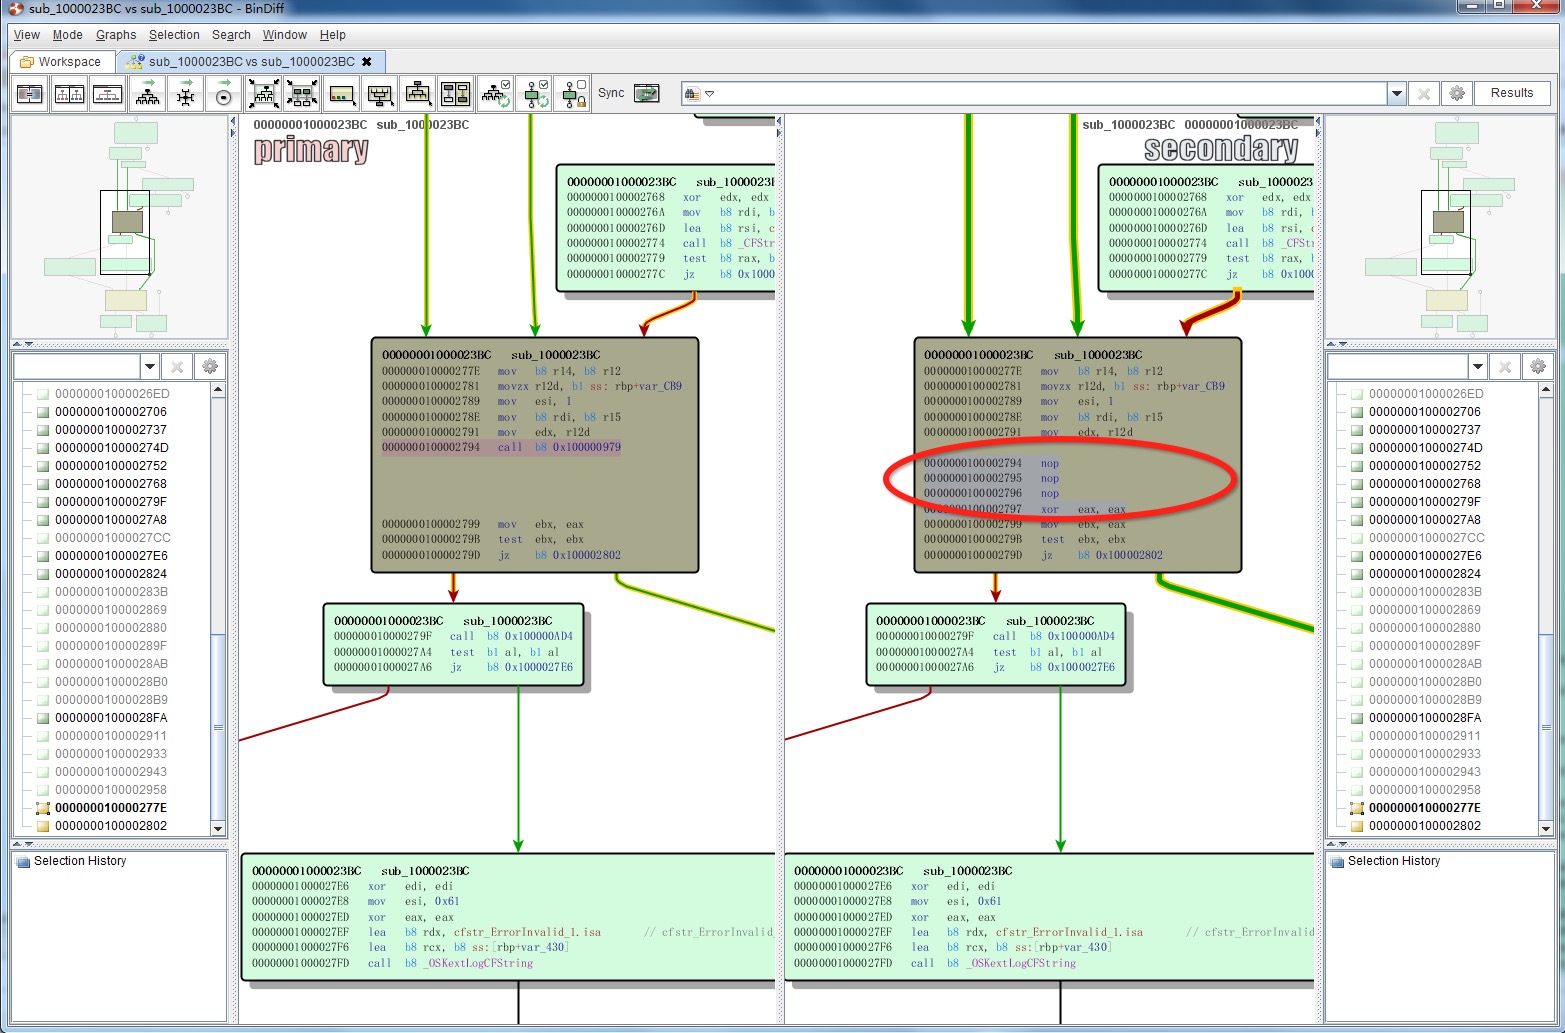
2.2 sub_1000023bc 该函数相似度有99%,查看patch后的前后对比的具体细节,如下图所示:
通过nop指令,干掉了对sub_100000979函数的调用。直接通过xor指令清零eax。
查看sub_100000979的伪代码,看看该函数究竟做了些什么。
1
2
3
4
5
6
7
8
9
10
11
12
13
14
15
16
17
18
19
20
21
22
23
24
25
26
27
28
29
30
31
32
33
34
35
36
37
38
39
40
41
42
43
44
45
46
47
48
49
50
51
52
53
54
55
56
57
58
59
60
61
62
63
64
65
66
67
__int64 __fastcall check_sign (__int64 a1, char a2, char a3) char v3; char v4; __int64 v5; int v6; __int64 v7; __int64 v8; __int64 v9; __int64 v10; __CFString *v11; __int64 v12; __int64 v14; __int64 v15; v3 = a3; v4 = a2; v5 = a1; v15 = 0L L; v14 = 0L L; v6 = -67061 ; if ( a1 ) { LODWORD(v7) = OSKextGetURL(); LODWORD(v8) = CFURLCopyAbsoluteURL(v7); v9 = v8; if ( v8 ) { if ( SecStaticCodeCreateWithPath(v8, 0L L, &v15) || !v15 ) goto LABEL_26; LODWORD(v10) = OSKextGetIdentifier(a1); v11 = &cfstr_AnchorApple; if ( !(unsigned __int8)CFStringHasPrefix(v10, &cfstr_Com_apple_) ) v11 = &cfstr_AnchorAppleGen; if ( SecRequirementCreateWithString(v11, 0L L, &v14) || !v14 ) { LABEL_26: OSKextLog(0L L, 17L L, "Memory allocation failure." ); v6 = -67061 ; } else { if ( v3 ) v12 = 536870913L L; else v12 = 1073741825L L; v6 = SecStaticCodeCheckValidity(v15, v12); if ( v4 && v6 && (unsigned __int8)sub_100000B19(v5, v9, 1L L) ) v6 = 0 ; } CFRelease(v9); if ( v15 ) CFRelease(v15); } else { OSKextLog(0L L, 17L L, "Memory allocation failure." ); v6 = -67061 ; } if ( v14 ) CFRelease(v14); } return (unsigned int )v6; }
可以看到最核心的就是调用了SecStaticCodeCheckValidity这个函数。
1 2 3 4 5 6 7 8 9 10 11 12 13 14 15 16 @function SecStaticCodeCheckValidity Performs static validation on the given SecStaticCode object. The call obtains and verifies the signature on the code object. It checks the validity of all sealed components (including resources, if any). It validates the code against a SecRequirement if one is given. The call succeeds if all these conditions are satisfactory. It fails otherwise. */ @function SecStaticCodeCheckValidity 认证传入的SecStaticCode对象的合法性,该函数调用获取并检测数字签名的合法性。 认证内容包含了所有的组件(如果存在资源文件同样会检测)。 如果提供了加密的内容,也会对加密部分进行认证。 当所有条件满足时函数调用返回成功。 */
这是该函数在头文件中的定义。
0x03 小结 经过测试确实可以绕过数字签名的检测成功加载了未签名的内核扩展。
通过对kextload的patch,绕过两个检测函数,从而达到了绕过OSX系统对驱动扩展的签名检测,结合CVE-2016-1757 的root权限执行任意代码,从而实现了,普通用户可以加载任意未签名的内核扩展。
0x04 勘误 由于不够严谨,遗漏了一个patch的点,这里补上。更详细的原理在exploit的分析文章中可以看到。
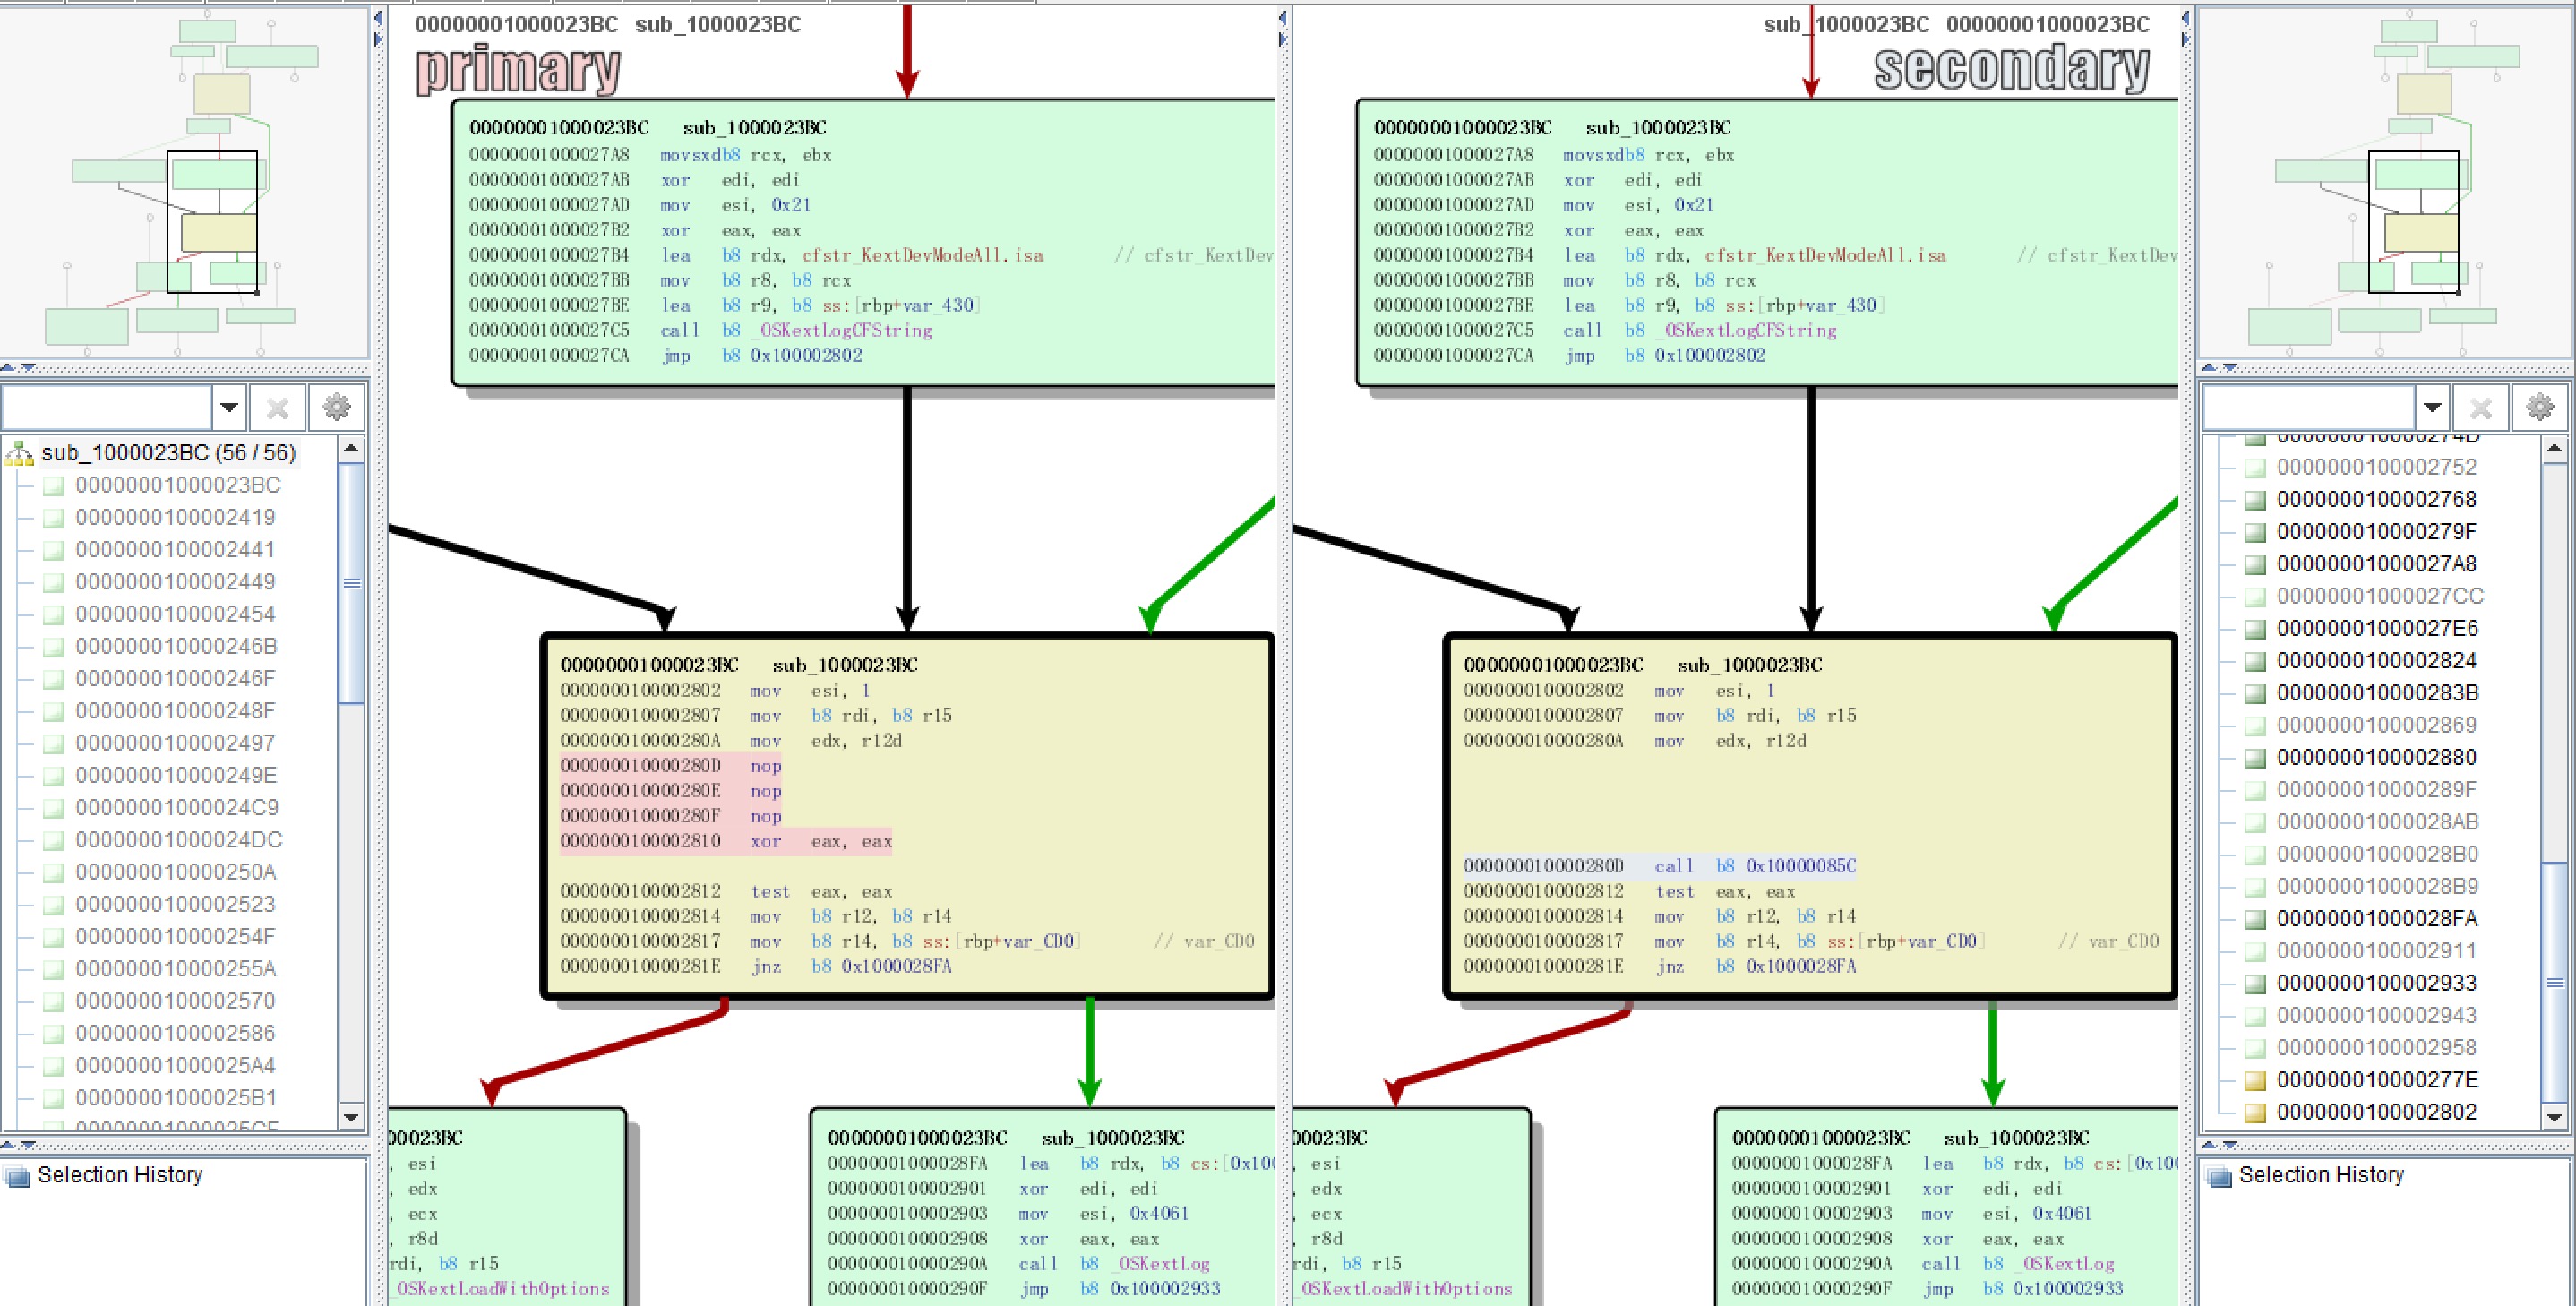
4.1 sub_1000023BC 在sub_1000023BC函数中的对sub_085c的调用被patch修改绕过签名验证。
1 2 3 4 5 6 7 8 __text:0000000100002802 mov esi, 1 __text:0000000100002807 mov rdi, r15 __text:000000010000280 A mov edx, r12d __text:000000010000280 D call sub_10000085C __text:0000000100002812 test eax, eax __text:0000000100002814 mov r12, r14 __text:0000000100002817 mov r14, [rbp+var_CD0] __text:000000010000281 E jnz loc_1000028FA
patch后代码如下:
1 2 3 4 5 6 7 8 9 10 11 __text:000000010000277 E mov r14, r12 __text:0000000100002781 movzx r12d, [rbp+var_CB9] __text:0000000100002789 mov esi, 1 __text:000000010000278 E mov rdi, r15 __text:0000000100002791 mov edx, r12d __text:0000000100002794 nop __text:0000000100002795 nop __text:0000000100002796 nop __text:0000000100002797 xor eax, eax __text:0000000100002799 mov ebx, eax __text:000000010000279 B test ebx, ebx
bindiif如下图所示:
ps: 这是我的学习分享博客http://turingh.github.io/
欢迎大家来探讨,不足之处还请指正。